Cómo poner Ñ y tildes en las vocales con un teclado no español (Mac OS)
Muchas personas de todo el mundo tienen dificultades para escribir bien en español porque los teclados de sus ordenadores no tienen la letra Ñ ni los signos de inicio de la admiración y la interrogación, y tampoco permiten escribir las cinco vocales con tilde.
Con un sistema operativo Windows y en ese post se explica cómo escribir con un ordenador con un sistema operativo Mac OS.
Si tienes un laptop Apple, tienes dos opciones para escribir con tu teclado la letra Ñ y las vocales con tildes.
La más sencilla es presionar durante unos segundos la vocal correspondiente o la letra N (para la Ñ) y verás como aparecen encima de estas letras unas cajas con varias opciones similares a las de los teléfonos móviles, como puedes ver en la imagen inferior.
Luego solo tienes que seleccionar el caracter que quieras escribir con el ratón o pulsar en la tecla del número situado debajo (por ejemplo, el 2 en el caso de la á).
Este sistema también funciona con las mayúsculas tanto de las vocales como de la letra Ñ (No hay datos de laptops británicos, estadounidenses, franceses y alemanes).
Pero, por lo que respecta a los símbolos de apertura en español de las preguntas y las exclamaciones, la tecla que debes pulsar para que aparezca cada uno de ellos depende del país para el que se ha fabricado el teclado ya que se encuentran en lugares distintos.
La segunda opción que puedes utilizar para escribir tanto la letra Ñ como las vocales con tildes y los signos de inicio de la interrogación y la exclamación solo funciona en los teclados de los ordenadores de algunos países, entre ellos Estados Unidos y el Reino Unido.
En este caso, hay que pulsar una combinación de teclas para que aparezca cada uno de estos caracteres.
Vocales en minúsculas con tilde:
Para escribir cualquiera de las 5 vocales con tilde hay que presionar primero a la vez la tecla ALT / OPTION y la letra e. Así aparece la tilde. Después solo hay que dejar de pulsar estas dos teclas y presionar la vocal que se quiera escribir.
- á = ALT + e y después a
- é = ALT + e y después e
- í = ALT + e y después i
- ó = ALT + e y después o
- ú = ALT + e y después u
Letras ñ y Ñ:
La letra Ñ, tanto en minúscula como en mayúscula, se escribe con un sistema similar, aunque en este caso hay que presionar primero a la vez la tecla ALT / OPTION y la letra n. Así aparece la virgulilla, o cola de ‘chancho (cerdo)’, de la Ñ. Después solo hay que dejar de pulsar estas dos teclas y presionar la n para la ñ y la N para la Ñ.
- ñ = ALT + n y después n
- Ñ = ALT + n y después N
Vocales en mayúsculas con tilde:
Para escribir estas letras, la combinación de teclas es más difícil porque es diferente para cada vocal.
- Á = ALT + y (las dos a la vez)
- É = ALT + e y después E
- Í = ALT + SHIFT (mayúsculas) + s (las tres a la vez)
- Ó = ALT + SHIFT (mayúsculas) + h (las tres a la vez)
- Ú = ALT + SHIFT (mayúsculas) + ; (las tres a la vez)
Signos iniciales de admiración e interrogación:
Finalmente, escribir los símbolos de apertura de las exclamaciones y las preguntas interrogaciones requiere otras combinaciones diferentes de teclas.
- ¡ = ALT + 1 (las dos a la vez)
- ¿ = ALT + SHIFT (mayúsculas) + / (las tres a la vez)

NOTA (Parte de un comentario en un foro): La tercera opción es habilitar el teclado español desde las configuraciones de sistema. De esa manera, cuando se necesita escribir en Español, cambias de formato de teclado. Y para ingles (u otro idioma), te cambias al respectivo. Una ventaja adicional, es que habilita las reglas de puntuación y gramática, de manera automática.
Claro, eso no siempre es posible, especialmente en laptops que tienen restricciones.
Aprender español: Reglas de acentuación (nivel intermedio) – Youtube
En Linux
En Linux la cosa cambia respecto a Windows 10 y OS X El Capitan, ya que hay varias distribuciones y cada una puede tener sus propias particularidades. Algunas de sus distribuciones más famosas son: Arch, Red Hat, Debian, Fedora, CentOS, Ubuntu, Lubuntu, entre otras…
– En UNIXGuide podemos encontrar una lista de atajos comunes para la mayoría de distribuciones.
http://www.unixguide.net/linux/linuxshortcuts.shtml
– Ubuntu se podría decir que es la distribución más expandida de todas, de manera, que es su web, podemos encontrar su propia lista de atajos de teclado.
https://help.ubuntu.com/community/KeyboardShortcuts
– Linux Mint Community dispone de una lista de atajos específico para la interfaz gráfica GNOME.
https://community.linuxmint.com/tutorial/view/45
Teniendo teclado en Ingles
Seguido te damos unos sencillos pasos para resolver este pequeño inconveniente:
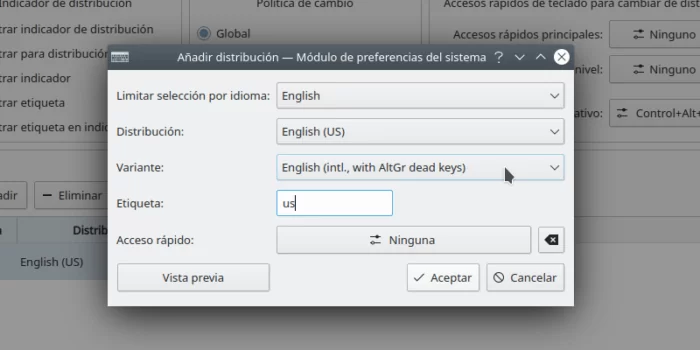
- Ir a Sistema > Preferencias > Teclado (o simplemente tipeamos «teclado» en el menú de inicio)
- Hacemos clic en la pestaña Distribuciones y luego en el botón Añadir.
- Si tienes el teclado de Estados Unidos, elige el teclado de Estados Unidos y elije la variante «EEUU Internacional (con teclas muertas)» o «English International with AltGr dead keys».
- Haz clic en Añadir y cuando retornes a la ventana principal, elije esta como configuración por defecto. Si deseas puedes eliminar la que tenias anteriormente.
- Ahora podrás colocar acentos y ñ en Ubuntu de la siguiente manera:
ñ = presionando Alt Gr (la Alt que está a la derecha de la barra espaciadora) y luego sin soltar altgr presionar la n
á = presionando Alt Gr y luego la a
é = presionando Alt Gr y luego la e
í = presionando Alt Gr y luego la i
ó = presionando Alt Gr y luego la o
ú = presionando Alt Gr y luego la u
ü = presionando Mayus + ‘ soltarlas y luego presionar la u
En Inglés (international, AltGr Dead Keys), para escribir en español con este teclado solo tienes que presionar AltGR (El alt del lado derecho, a la derecha de la barra espaciadora) y la tecla que quieres escribir en español. Por ejemplo:
AltGr+n = ñ
AltGr+a = á
AltGr+e = é
AltGr+i = í
AltGr+o = ó
AltGr+u = ú
Artículos y textos de:
The – externally-managed-environment – in Python
To avoid this message which is to force you somehow to create a virtual environment in python:
$ pip install .
error: externally-managed-environment

× This environment is externally managed
??> To install Python packages system-wide, try 'pacman -S
    python-xyz', where xyz is the package you are trying to
    install.

    If you wish to install a non-Arch-packaged Python package,
    create a virtual environment using 'python -m venv path/to/venv'.
    Then use path/to/venv/bin/python and path/to/venv/bin/pip.

    If you wish to install a non-Arch packaged Python application,
    it may be easiest to use 'pipx install xyz', which will manage a
    virtual environment for you. Make sure you have python-pipx
    installed via pacman.

note: If you believe this is a mistake, please contact your Python installation or OS distribution provider. You can override this, at the risk of breaking your Python installation or OS, by passing --break-system-packages.
hint: See PEP 668 for the detailed specification.
Just remove this in Linux:
sudo rm /usr/lib/python3.11/EXTERNALLY-MANAGEDIf you are using Homebrew just go to:
cd /home/linuxbrew/.linuxbrew/Cellar/python@3.12/3.12.2_1/lib/python3.12and remove the file EXTERNALLY-MANAGED as well.
If on the other side, prefer to create a virtual environment, this is the way, install this package:
python3-venvIn the environment you prefer to work with, use this command:
python3 -m venv .venvYou can check all the installed packaged here:
user@server# ls .venv/
bin  include  lib  lib64  pyvenv.cfg
Then you have to activate the environment:
source .venv/bin/activateThen it’s possible to use pip to install packages in that environment:
pip install -r requirements.txtpip install openaiThat’s it.
To deactivate the environment:
deactivateHow to Add a User on Arch Linux
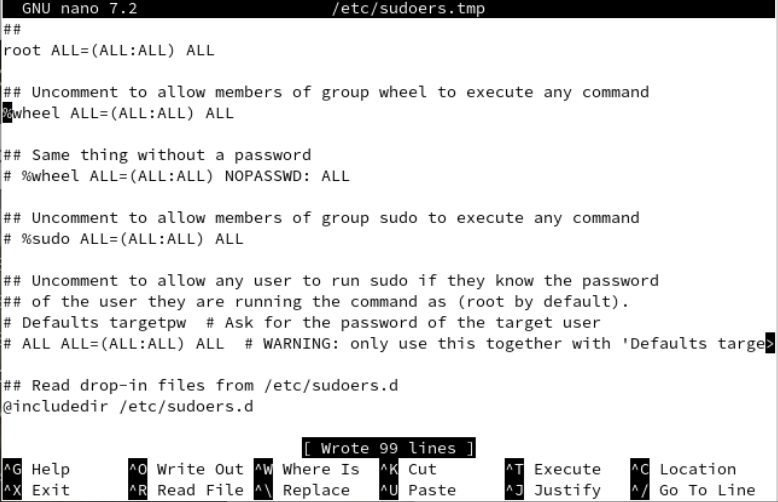
User management is the most needed utility in any operating system because it makes your system secure and provides you an opportunity to assign the right privileges to the right ones. The users can make a lot of changes to your system according to the rights they have. Therefore, it’s very necessary to have a very close look at each activity that is performed by the users. Thus, this guide elaborates on the method to add the new users to the Arch Linux system and how to manage them. Before moving towards the addition of users in the Arch Linux system, we need to make sure that the group is already enabled. To do so, we use the following “visudo” command with “sudo”. This is typically used to make changes to the sudoers file:
[user@host ~]$ sudo EDITOR=nano visudoThe sudouers file is launched in the “nano” editor. You will find the “wheel” group in the following illustration. Uncomment it and save the file to update the changes. Use “Ctrl-x” to exit.
Add a User
Now, we add a new “test” user to the Arch Linux system using the “useradd” instruction with the “sudo” rights. This instruction doesn’t take anything in return which indicates that the user is created.
[user@host ~]$ sudo useradd testNow, it’s very necessary to secure an account that is just created. For this, we establish a new user and add a new password. Therefore, we utilize the shell’s “passwd” command along with the user “test” as our input. You are prompted by the terminal to enter a new password. After providing the password twice, it is updated successfully.
[user@host ~]$ sudo passwd testNew password:
Retype new password:
passwd: password updated successfully
In case you want to perform the process of user addition to arch Linux along with setting its password at once, you can do so by modifying the useradd instruction. For this, you should use the “-m” and “-p” flags in the instruction. The “-m” flag can be utilized to name a new user while the “-p” option can be used to set the password for the user to be created. For example, we create a “dummy” user with the “dummy123” password via the useradd instruction in the following:
[user@host ~]$ sudo useradd -m dummy -p dummy123The other thing that you can achieve using the useradd instruction is to set the custom directory for a new user using the “-d” option with the path to the directory. The following instruction shows that we created a “new” user and a “new” password and set its custom directory as “/tmp/new”:
[user@host ~]$ sudo useradd -d /tmp/new -m new -p newThere are a lot of groups which are available in Arch Linux to perform the different functions according to their group types. To add a user to a particular group in Arch Linux, the useradd command comes up with the “-G” option to add a particular user to any group. For example, the following instruction adds a new “blue” user in the wheel, audio, and video group while creating:
[user@host ~]$ sudo useradd -G wheel,audio,video -m blue -p blueThere is also a way to add the system users in Arch Linux using the useradd instruction. For this, you need to use the “-r” option with the “-s” flag followed by the path to the “fish” directory, i.e. “/usr/bin/fish”. The “hell” user is created as you can see from the attached command. The output of this instruction generates a warning.
[user@host ~]$ sudo useradd -r -s /usr/bin/fish helluseradd: Warning: missing or non-executable shell ‘/usr/bin/fish’
You can also do it if you wish to confirm the outcome of the aforementioned instruction. For that, try using the following “su’ instruction with the name of a user that you just created. It might show you a warning.
[user@host ~]$ sudo su - hellsu: warning: cannot change directory to /home/hell: No such file or directory
After that, try the whoami one-word instruction on the shell. You will see that it returns the name of a system user that you just created.
[user@host ]$ whoami
hell
User Modification
While using the arch Linux and creating new users, you should have a piece of knowledge about the user properties and a way to modify them. Consider the scenario where we want to rename the “test” to “test1” user. For this, we use the usermod instruction with the “-l” option followed by the new name and then an old name as shown in the following attached command:
[user@host ~]$ sudo usermod -l test1 testNow, if you want to set the expiry date for a newly created user account, you can also set that using the usermod instruction followed by its “—expiry date” option. The option follows the date and then a username. The “test1” is our new user name in this case.
[user@host ~]$ sudo usermod --expiredate 2022-01-23 test1Now, if you want to add your user to the additional groups, you can do so by using the –append option in the usermod instruction followed by the –groups option with the group names and the name of a user to be added. The wheel and users are 2 groups while the test1 is a user.
[user@host ~]$ sudo usermod --append --groups wheel,users test1To modify the default shell that is used by a user, you can use the –shell option in a usermod instruction. In this instruction, you should provide the path to the shell file like /usr/bin/bash.
[user@host ~]$ sudo usermod --shell /usr/bin/bash test1Lock/Unlock the User
In case you don’t want anybody to use the particular account, you might lock it. To lock an account, the –lock option can be used in the usermod instruction with the name of a user which is “test1”.
[user@host ~]$ sudo usermod --lock test1In the same way, if you want to allow a particular user to use its system account, you should unlock the particular account using the “unlock” option in the usermod instruction with the same user name as shown in the attached instruction:
[user@host ~]$ sudo usermod --unlock test1Delete the User
To display the currently available users of your Arch Linux, try using the instruction as follows:
[user@host  ~]$ cut -d: -f1 /etc/passwd
root
bin
daemon
omar
dummy
new
blue
hell
test1
To delete the new and previously made users, the “userdel” instruction can be utilized. This command takes one or more usernames at once.
[user@host  ~]$ sudo userdel test1
[user@host  ~]$ sudo userdel hell
[user@host  ~]$ sudo userdel blue new
[/c]c
If you create a user with a related home directory, you can delete it using the –r option.
[cc lang="bash" width="100%" height="100%" escaped="true" theme="blackboard" nowrap="0"]
[omar@omar ~]$ sudo userdel -r dummy
Conclusion
The introductory paragraph explains the importance of user management in all sorts of operating systems. To support the discussion, we tried the different instructions to create the new users, modify, lock or unlock, and delete them. For this, we utilized the useradd, usermod, and userdel instructions with the –m, -p, -G, -r, -s, -l, –append, –shell, –lock, –unlock, and –expiredate options.
Article originally written by https://linuxhint.com/add_users_arch_linux/
NOTES:
You have to use -m, otherwise no home directory will be created. If you want to specify the path of the home directory, use -d and specify the path:
useradd -m -d /PATH/TO/FOLDER USERNAME
You can then set the password with:
passwd USERNAME
All of the above need to be run as root, or with the sudo command beforehand. For more info, run man adduser.